


Damaged gear shows up more often than most shops admit. A 200A load center arrives with a cracked dead-front. A transformer gets dropped off the liftgate and the enclosure is bowed. An EV charger ships from the distributor with the mounting bracket bent from poor packing. None of this is your fault — but if your paper trail is weak, you end up eating the cost anyway.
The problem isn't that carriers and vendors refuse legitimate claims. It's that most electrical shops don't capture evidence in the right order, at the right time, from the right person. By the time someone notices the damage, the install is half done, the packaging is in a dumpster, and the delivery receipt was signed "clear" by an apprentice who didn't look inside the box.
This post is strictly about one thing: the evidence sequence and claim timeline for transport and installation damage. Not warranty defects. Not workmanship callbacks. Specifically the stuff that gets broken between the vendor's dock and your customer's wall.
Where transport claims actually fall apart
The money doesn't disappear when the gear breaks. It disappears at specific failure points, and they're almost always the same ones.
The signature. A driver hands your tech a tablet. The tech signs. That signature just told the carrier everything arrived in good condition. If the pallet was shrink-wrapped and the damage is inside the box, you've now signed away your freight claim before anyone opened anything.
The timing gap. Concealed damage claims have deadlines. Depending on the carrier and the terms, you often have as little as 5 business days — sometimes less for certain vendors — to report damage you couldn't see at delivery. Shops that store gear in a warehouse for two weeks before install routinely blow past this window without knowing it existed.
The missing baseline. Nobody photographed the item when it arrived. So when the tech cracks it during installation and the shop files a transport claim, there's no way to prove it came in broken versus got broken on the job. Carriers and vendors know this, and they lean on it hard.
The ownership confusion. Who files — the shop, the general contractor, the customer? Who's the shipper of record? On a job where the customer bought the panel directly from a supply house and you're just installing it, the person with claim standing might not even be you.
A typical scenario: a shop installs a $2,800 switchgear section, notices a hairline crack in the bus housing during energization, and files a claim three weeks later. The vendor asks for delivery photos. There are none. The vendor asks for the inspection notation on the BOL. It says "received in good order." Claim denied. The shop absorbs the replacement and the second trip.
The core idea: a field→claims timeline
The fix is treating every piece of major gear as if it might be damaged, and locking down evidence in a fixed sequence from the moment it hits the dock. Not when it's convenient. Not after install. In order.
Never miss a job or delay a dispatch again.
Voltzly helps you schedule, assign, and track every electrical job efficiently.
- Unified job scheduling
- Real-time technician tracking
- Automated client notifications
No credit card required
-
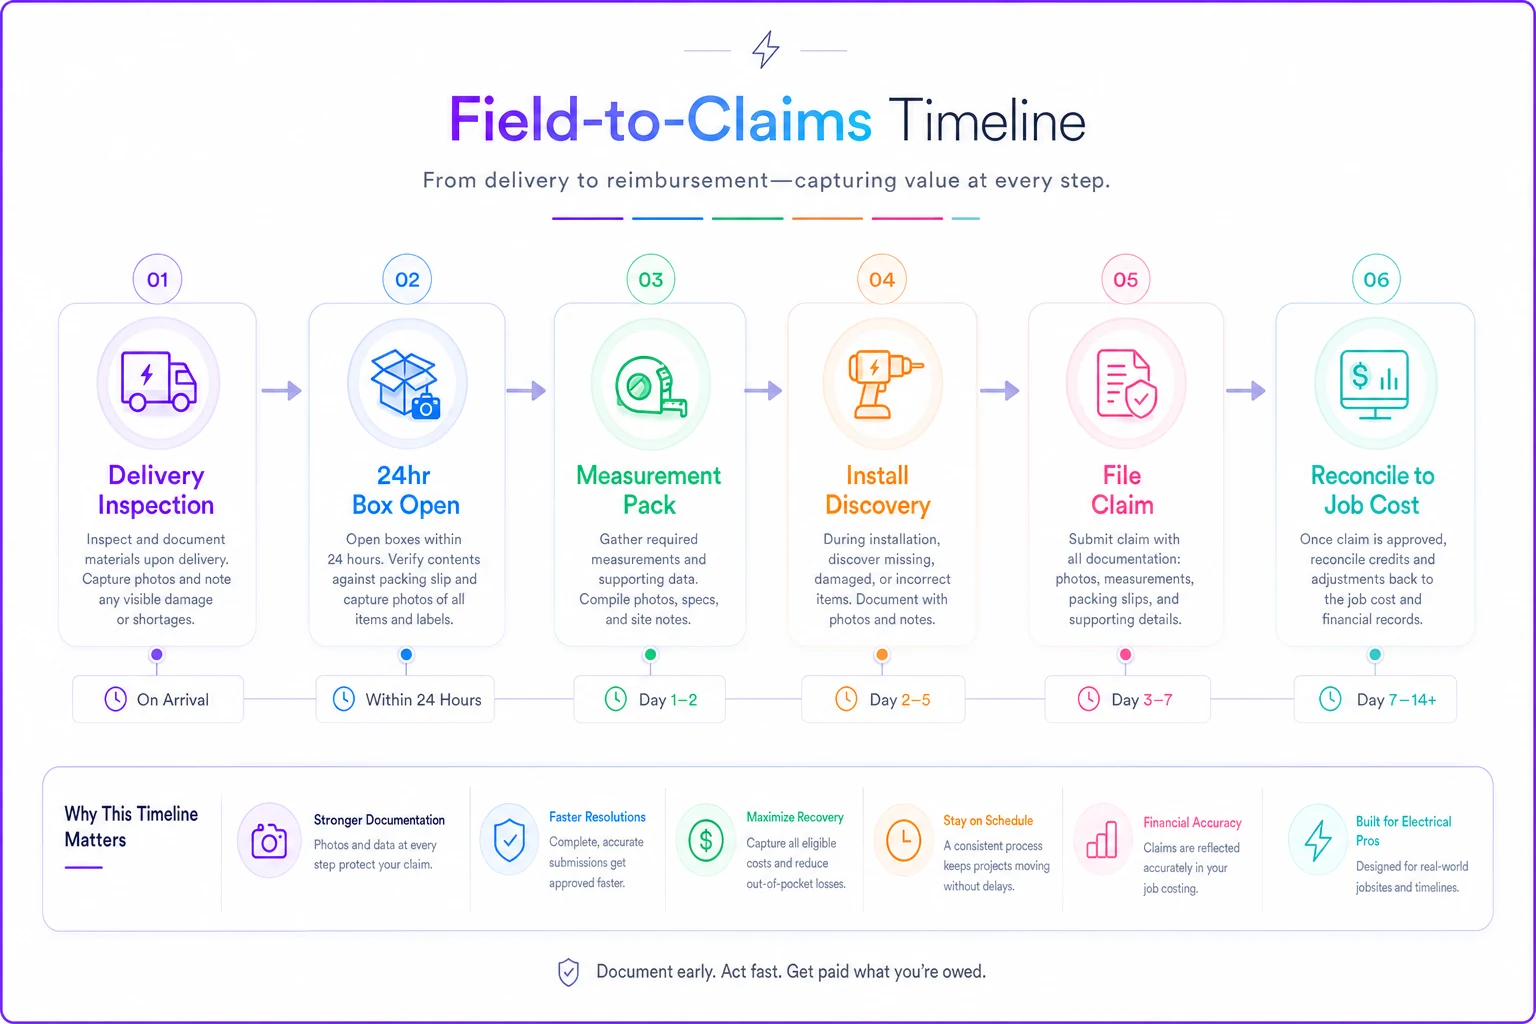
1. At delivery — before signing. Walk the pallet. Photograph all four sides, the top, and any crush, puncture, or tilt-indicator damage. If anything looks off, note it on the delivery receipt before signing: "Received subject to inspection — possible concealed damage, box 2 corner crushed." That one line preserves your right to file later.
-
2. Within 24 hours — box open inspection. Open and inspect every major item within a day, even if install is weeks out. Photograph the packaging condition and the item condition together, in the same frame when possible. This is your baseline.
-
3. Measurement pack. For anything with a fit or alignment tolerance — enclosures, bus sections, bracket assemblies — record actual measurements against spec. A bowed enclosure that's 3/16" out of square is evidence. "It looked bent" is not.
-
4. At install — damage discovery. If damage surfaces during installation, stop. Photograph before you touch it further. Capture the serial/lot number, the surrounding packaging if you still have it, and the exact nature of the fault.
-
5. File — inside the deadline. Submit to the correct party (carrier vs. vendor) with the full pack attached, using a templated email so nothing gets left out.
-
6. Reconcile — accounting closes the loop. Track the claim against the job cost until a credit or replacement actually lands. Claims that get filed but never reconciled are just losses with extra steps.
The whole point of ordering it this way is that each step feeds the next. The delivery photos protect the right to file. The 24-hour inspection establishes the baseline. The install photos prove where the damage was discovered, not caused.
The sequence only works if it's treated as a fixed process, not something techs do when they remember to.
The sequence only works if it's treated as a fixed process, not something techs do when they remember to.
The photo and measurement pack
Carriers and vendors reject vague claims fast. A pack that gets paid looks consistent every time. Here's what belongs in it.
Photos (minimum set):
-
All four sides of the packaging/pallet at delivery
-
Any tilt/shock indicator readings (those little Shockwatch stickers)
-
The delivery receipt with your inspection notation visible
-
Packaging interior after opening (padding, voids, shifting)
-
The damaged area, wide shot and close-up
-
Serial/model/lot label, readable
-
A tape measure or reference object in frame for scale on dimensional damage
Measurements (when applicable):
| Item type | What to record | Why it matters |
|---|---|---|
| Load centers / panels | Enclosure squareness, dead-front fit gap | Bowing/racking damage is dimensional, not visual |
| Switchgear / bus | Bus bar alignment, housing cracks (length) | Hairline cracks get disputed without a measured length |
| Transformers | Enclosure deflection, mounting foot flatness | Drop damage shows in the base, not always the body |
| EV chargers | Bracket angle, mounting hole alignment | Bent brackets look "installable" but aren't |
| Conduit/raceway bundles | Count vs. packing slip, crush deformation | Shortages and crush both qualify |
The measurement column is what separates shops that get paid from shops that get a polite denial. Anyone can say something looks damaged. A recorded 1/4" enclosure deflection against a flat spec is hard to argue with.
Consistent file naming matters more than people think. If your photos are saved as IMG_4471.jpg, nobody downstream can tell what they're looking at six weeks later. A simple convention — job number, item, step — makes the pack self-explanatory. This ties directly into broader field-data governance that makes jobs audit-ready, where the same photo discipline protects you on inspections and insurer disputes, not just freight claims.
Templated carrier and vendor emails
The reason to template these is simple: under deadline pressure, people forget to include the claim number, the PO, or the required photos, and the clock keeps running while the back-and-forth drags. A good template forces completeness on the first send.
Carrier freight claim (concealed damage) — structure:
-
Subject
Concealed Damage Claim — [PO#] / [BOL#] / Delivered [date]
-
Delivery details
date, driver, PRO/tracking number
-
Statement that damage was concealed and discovered within [X] of delivery
-
Itemized damage with replacement value
-
Attached
delivery photos, inspection notation, opened-box photos, measurements
-
Requested resolution
replacement or credit, and the deadline you're acknowledging
Vendor/distributor claim — structure:
-
Subject
Damaged Shipment — [PO#] — Replacement Requested
-
Order and line-item reference
-
Condition on arrival vs. spec
-
Whether you're requesting advance replacement (so the job isn't held up) or credit
-
Attached evidence pack
-
Your requested RMA handling
That last point — advance replacement versus credit — is where a lot of job delays live. If you can get the replacement unit shipped before the damaged one goes back, the install stays on schedule. The physical return side of this, the RMA and the credit tracking, runs on its own rails. If you don't have that dialed in, the reverse-logistics and RMA workflow for parts returns is worth setting up alongside this, because a transport claim and an RMA return often ride the same shipment.
The escalation path
Most claims stall — they don't die outright. They sit in someone's queue. Without an escalation path, your AR person assumes no news is fine and three weeks evaporate.
-
Day 0 File with full pack.
-
Day 3 Confirm receipt and claim number. If no acknowledgment, call.
-
Day 10 No substantive response → escalate to the carrier's claims supervisor or the distributor's account rep by name.
-
Day 20 Still stalled → loop in your purchasing contact and reference the dollar amount against your account volume. Vendors move faster for accounts they want to keep.
-
Day 30 Decision point — pursue through the carrier's formal dispute process, or write it off and adjust how you buy from that lane.
Claims under a few hundred dollars often cost more in labor to chase than they return. Claims over roughly $1,500–$2,000 almost always justify the escalation. Knowing your own threshold keeps your office staff from burning hours on a $180 cracked cover.
Accounting reconciliation checklist
Filing isn't the finish line. The claim is only closed when a credit memo or replacement actually hits the books and gets tied back to the job it came from. This is the step shops skip most, and it's where real money leaks out quietly.
-
[ ] Claim logged with number, filed date, and dollar amount
-
[ ] Linked to the originating PO and job
-
[ ] Damaged item cost flagged on the job so it doesn't silently inflate job cost
-
[ ] Replacement received and inspected (and its own delivery documented — yes, again)
-
[ ] Credit memo received and matched to the claim amount
-
[ ] Partial credits investigated, not just accepted
-
[ ] Claim marked closed only after dollars reconcile
-
[ ] Repeat-offender vendors/lanes flagged for buying review
A quick note on that last box: when the same supply house or the same freight lane keeps producing damaged deliveries, that's not bad luck — that's a packaging or handling problem you can price around or route around. Two or three damaged transformers from one lane in a quarter should change how you buy, not just generate three separate claims.
A real scenario
A residential-and-light-commercial shop running about six techs was losing money on gear damage without really tracking it. Over a stretch of a few months they'd absorbed somewhere around $6k–$8k in damaged panels, bent EV brackets, and a dinged transformer — all written off because the evidence was too thin to file or the deadlines had passed.
The fix was unglamorous: a fixed delivery-inspection step before any signature, a 24-hour box-open rule even when install was weeks out, and two email templates for carrier versus vendor claims.
Over the next quarter they filed on four damage events. Three got paid — two as advance replacements that kept jobs on schedule, one as a straight credit. The fourth was a small cracked cover they chose not to chase because the labor to pursue it wasn't worth the return. Somewhere north of $4k recovered or avoided that previously would have vanished into job cost, plus two installs that didn't slip because replacements shipped before the returns went back.
The owner put it plainly: the gear didn't break any less often. They just stopped eating it.
When this process makes sense — and when it doesn't
It makes sense when you're regularly handling freight-delivered gear: panels, switchgear, transformers, commercial EV equipment, anything that ships on a pallet or arrives via LTL carrier. The higher the unit cost and the more handling between dock and wall, the more this pays off.
It's overkill when you're mostly buying small parts off the counter at a local supply house and carrying them in the van. A bent $12 bracket isn't worth a measurement pack. Scale the discipline to the dollar value.
Who should skip the full sequence: a solo operator doing small residential service work with almost no freight-delivered equipment. For them, the one habit worth keeping is the delivery-receipt notation — "received subject to inspection" — because that single line preserves options with basically no extra overhead.
The one habit that matters most
Never let a tech sign a clean delivery receipt on major gear without walking the pallet and noting any question marks first. That signature is the single most expensive thing a tired apprentice can do at the end of a delivery run, and it's completely preventable.
Everything downstream — the photos, the measurements, the templated emails, the escalation ladder, the reconciliation — exists to support claims you're actually allowed to file. And whether you're allowed to file almost always comes down to what happened in the ninety seconds before someone signed that tablet.
Build the sequence, keep the pack consistent, and tie every claim back to the job until the credit lands. The damage won't stop. But it stops being yours.
Build the sequence, keep the pack consistent, and tie every claim back to the job until the credit lands. The damage won't stop. But it stops being yours.
Ready to optimize your electrical service operations?
Join 500+ electrical service companies using Voltzly to improve scheduling accuracy, enhance client satisfaction, and boost operational efficiency.